
What's inside
- Getting started — the 5D website & signing in
- Opening the ticket submission form
- Submitting a new ticket (step by step)
- Understanding Tags, Subtags & Priority
- What happens after you submit
- How your priority request is reviewed
- Tracking your tickets in the portal
- Editing your ticket description
- Messages & notifications you'll receive
- Using the "Contact Us" form
- Troubleshooting & FAQ
- Quick reference card
- Internal users (task requesters)
1. Getting started
Everything related to support tickets happens on the 5D website. When you open any support or "My Tickets" page, the site automatically switches you into the 5D website, so you are always in the right place.
Signing in
Use your account to sign in from the website login page.
The login field is your username
On the 5D website the sign-in box is labelled username (not "Email"). Enter your username and password to log in.
Reaching your support area
After you sign in, opening /my (your portal home) takes you straight to your ticket list at /my/tickets. From there you can review existing tickets or start a new one.
Two things you will use most
My Tickets — the list of every ticket you have submitted (/my/tickets).
Create Ticket — the button that opens the submission form (see the next section).
Working inside the Odoo backend instead?
If you are an internal staff member who works in the Odoo backend, a small toolbar appears at the top-right with two shortcuts: a ticket icon that opens My Tickets, and a pencil icon that opens the ticket submission form. Portal customers use the website buttons described below.
2. Opening the ticket submission form
There are three ways to reach the form that creates a new ticket.
| Route | How |
|---|---|
| From "My Tickets" | Open /my/tickets and click the + Create Ticket button at the top of the list. This is the easiest route once you are signed in. |
| Backend toolbar | Internal staff can click the pencil icon in the top toolbar to jump to the submission form. |
3. Submitting a new ticket
The submission form is pre-filled with your details where possible, so you only need to describe your issue and categorise it. Fields marked * are required.
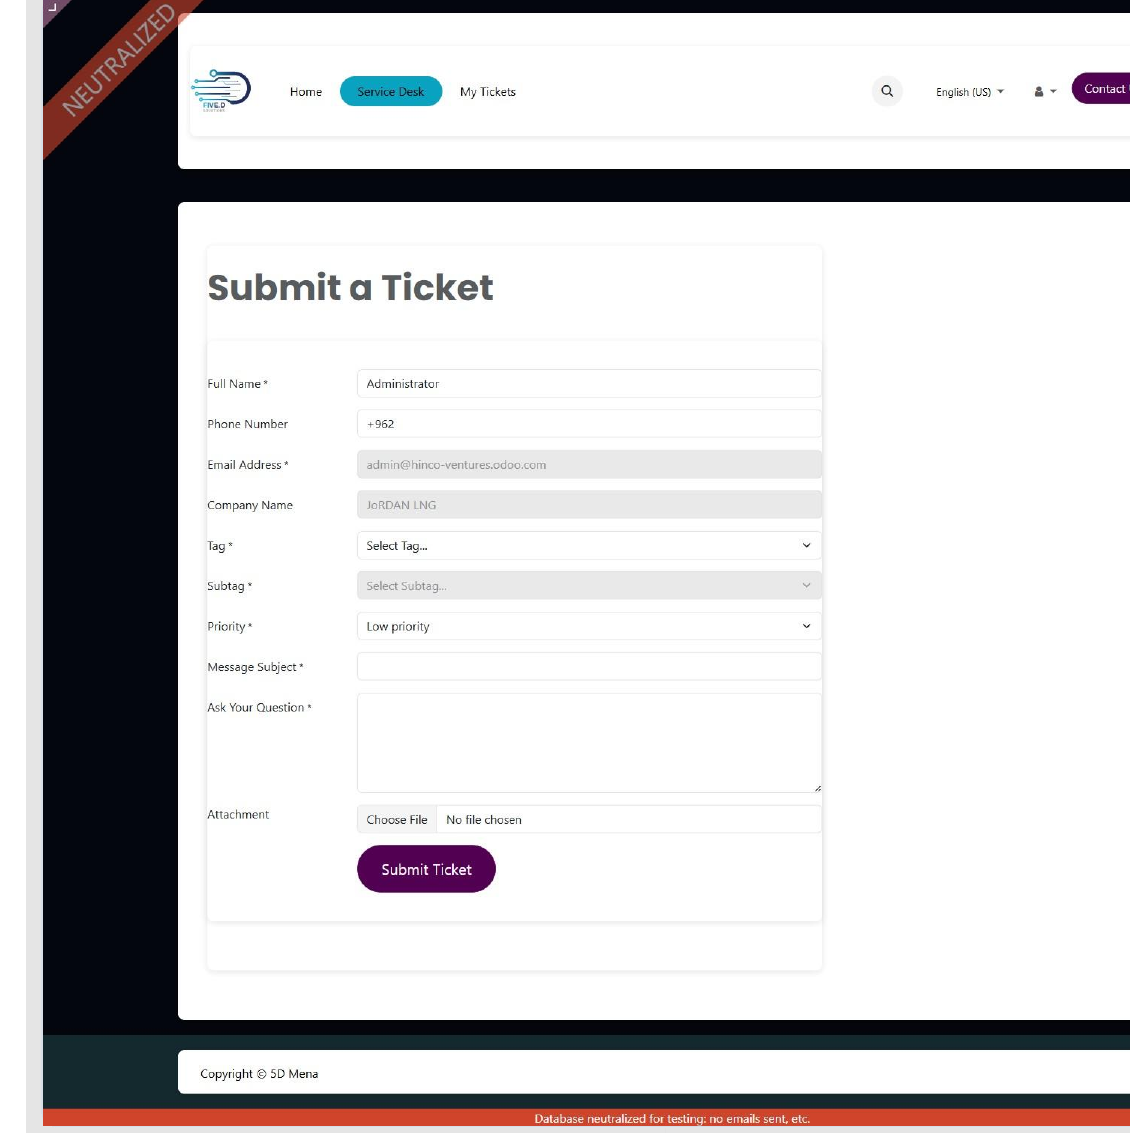
Fields that are filled in for you
| Field | Behaviour |
|---|---|
| Pre-filled from your account and shown as read-only — you don't need to type it, and it can't be changed on the form. | |
| Company | Pre-filled from your employee/company profile and shown as read-only. |
| Phone | Pre-filled from your profile when available. You can edit it, but it must follow the phone format rules below. |
Fields you complete
Tag dropdown.Subtag dropdown stays disabled until you pick a Tag. Once a Tag is selected, it shows only the subtags that belong to that Tag. Pick the one that best fits.Pick the Tag first
If the Subtag dropdown looks greyed-out, it's because no Tag has been chosen yet. Select a Tag and the matching subtags become available. Changing the Tag clears your previous subtag choice.
Phone number format
The phone field is validated before the form is sent. A valid number is either:
- Exactly 10 digits (for example
0791234567), or - A "+" followed by 9 to 15 digits (for example
+962791234567).
Common phone mistakes
Letters and other characters are not allowed. Spaces, dashes and brackets you type are cleaned up automatically, but the final number must still match one of the two patterns above. If it doesn't, submission is blocked, the field is highlighted in red, and a message explains the correct format.
4. Understanding Tags, Subtags & Priority
These three choices do more than label your ticket — they decide which team handles it and what its working priority is.
Tag → Subtag relationship
Every Subtag belongs to one or more Tags. That's why you choose the Tag first: it narrows the Subtag list down to the relevant options only. Choosing the most accurate Subtag helps your ticket reach the right people faster.
How your choices are used
| Your choice | What it controls |
|---|---|
| Subtag | Routing: the ticket is automatically assigned to the support team linked to that subtag. |
| Subtag | Base priority: the ticket's working priority is set from the subtag's own priority level. |
| Priority | Your request: the urgency you ask for. If it's higher than the subtag's base level, an agent reviews it before it's applied (Section 6). |
Tag → Subtag → Team reference
Every Subtag sends the ticket to a specific team and sets its base priority. Pick the Subtag that best matches the issue — this table shows where each one goes. Tickets route to one of four teams: Odoo, Hardware & Software, Testing, or Projects. "Others" is the catch-all in every category (lowest priority).
| Subtag | Routes to team | Base priority |
|---|---|---|
| Access Request | ||
| Odoo Reset Password | Odoo | High |
| Odoo New Account | Odoo | Medium |
| Odoo Modify Authority | Odoo | High |
| Shared Folder Access | Hardware & Software | Medium |
| Others | Odoo | Low |
| Application Change | ||
| Odoo Workflow Change | Odoo | High |
| Approval Process Change | Testing | Urgent |
| Odoo Report on Layout Change | Odoo | Medium |
| Others | Odoo | Low |
| Asset Assignment | ||
| Device Assignment | Hardware & Software | High |
| Others | Hardware & Software | Low |
| Asset Return | ||
| Employee Exit Return | Hardware & Software | Urgent |
| Damaged Return | Hardware & Software | Urgent |
| Replacement Return | Hardware & Software | Medium |
| Temporary Return | Hardware & Software | Low |
| Others | Hardware & Software | Low |
| New Email | Projects | High |
| Password Reset | Hardware & Software | Medium |
| Send / Receive Issue | Hardware & Software | Urgent |
| Signature Setup | Hardware & Software | Low |
| Spam Issue | Hardware & Software | Urgent |
| Import & Export Emails | Projects | High |
| Application Issue | Hardware & Software | Medium |
| Others | Hardware & Software | Low |
| Hardware | ||
| Laptop Issue | Hardware & Software | Medium |
| Printer (Print/Scan) Issue | Hardware & Software | High |
| Printer (Low Ink) | Hardware & Software | Medium |
| Keyboard / Mouse | Hardware & Software | Low |
| Others | Hardware & Software | Low |
| Network | ||
| Internet Down | Hardware & Software | Urgent |
| Slow Connection | Hardware & Software | Urgent |
| Others | Hardware & Software | Low |
| QA Testing | ||
| Functional Testing | Testing | High |
| Non-Functional Testing | Testing | Medium |
| Integration Testing | Testing | Medium |
| Regression Testing | Testing | High |
| Requirement Testing | Testing | High |
| Others | Odoo | Low |
| Recurring Issues | ||
| Odoo Daily Support | Odoo | Urgent |
| Odoo Training Session | Odoo | High |
| Others | Odoo | Low |
| Root Cause Analysis | ||
| Odoo Incident Investigation | Odoo | High |
| Odoo Performance Analysis | Odoo | High |
| Odoo Database Analysis | Odoo | Medium |
| Odoo Failure Report | Odoo | Urgent |
| Odoo Security Analysis | Odoo | Urgent |
| Others | Odoo | Low |
| Security | ||
| Enable / Disable User | Hardware & Software | High |
| Odoo Audit Log Tracking | Odoo | Medium |
| Security Issue | Hardware & Software | Urgent |
| Others | Hardware & Software | Low |
| Software | ||
| Installation / Uninstallation | Hardware & Software | High |
| Upgrade | Hardware & Software | Medium |
| Enable / Disable User | Hardware & Software | High |
| Others | Hardware & Software | Low |
5. What happens after you submit
As soon as your ticket is created, several things happen automatically.
You don't need to chase the ticket
Routing and prioritisation are handled for you. Just keep an eye on your ticket in My Tickets and watch for update messages.
6. How your priority request is reviewed
You can always request a higher priority, but higher-than-standard requests are confirmed by a support agent so urgency stays fair and consistent.
When a review is needed
If the Priority you requested is higher than the standard level for your chosen Subtag, the ticket is flagged for validation once an agent is handling it. Until it's reviewed, the ticket keeps the standard priority.
The two possible outcomes
| Outcome | What you'll see |
|---|---|
| Approved | A message appears in your ticket: "Ticket Priority Validated — the requested priority '…' has been approved." The ticket's priority is raised to what you asked for. |
| Rejected | A message appears in your ticket: "Requested Priority Rejected", together with a reason from the agent. The ticket stays at its standard priority. |
Why this exists
It keeps priorities meaningful: genuinely urgent issues get elevated, and every decision is explained in the ticket history so you always know where things stand.
7. Tracking your tickets
Your portal keeps a full record of every ticket you have submitted.
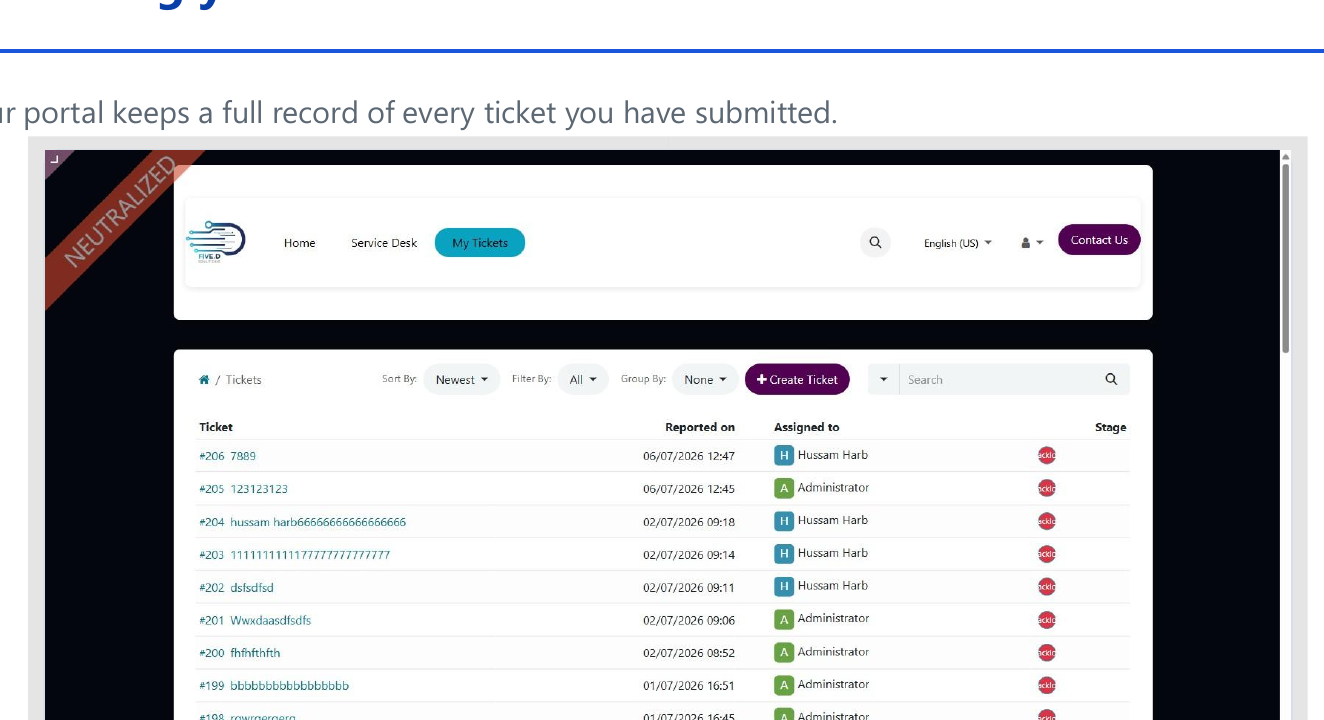
/my/tickets (or use the ticket shortcut icon if you work in the backend).Stages tell you where your ticket stands
Each ticket moves through stages as it is worked on. Whenever the stage changes, a note is added to your ticket that reads "Stage Changed: [old stage] → [new stage]", so you can always see progress at a glance.
8. Editing your ticket description
If you need to add detail or correct something after submitting, you can update the description of your own ticket directly from the portal — no need to open a new ticket.
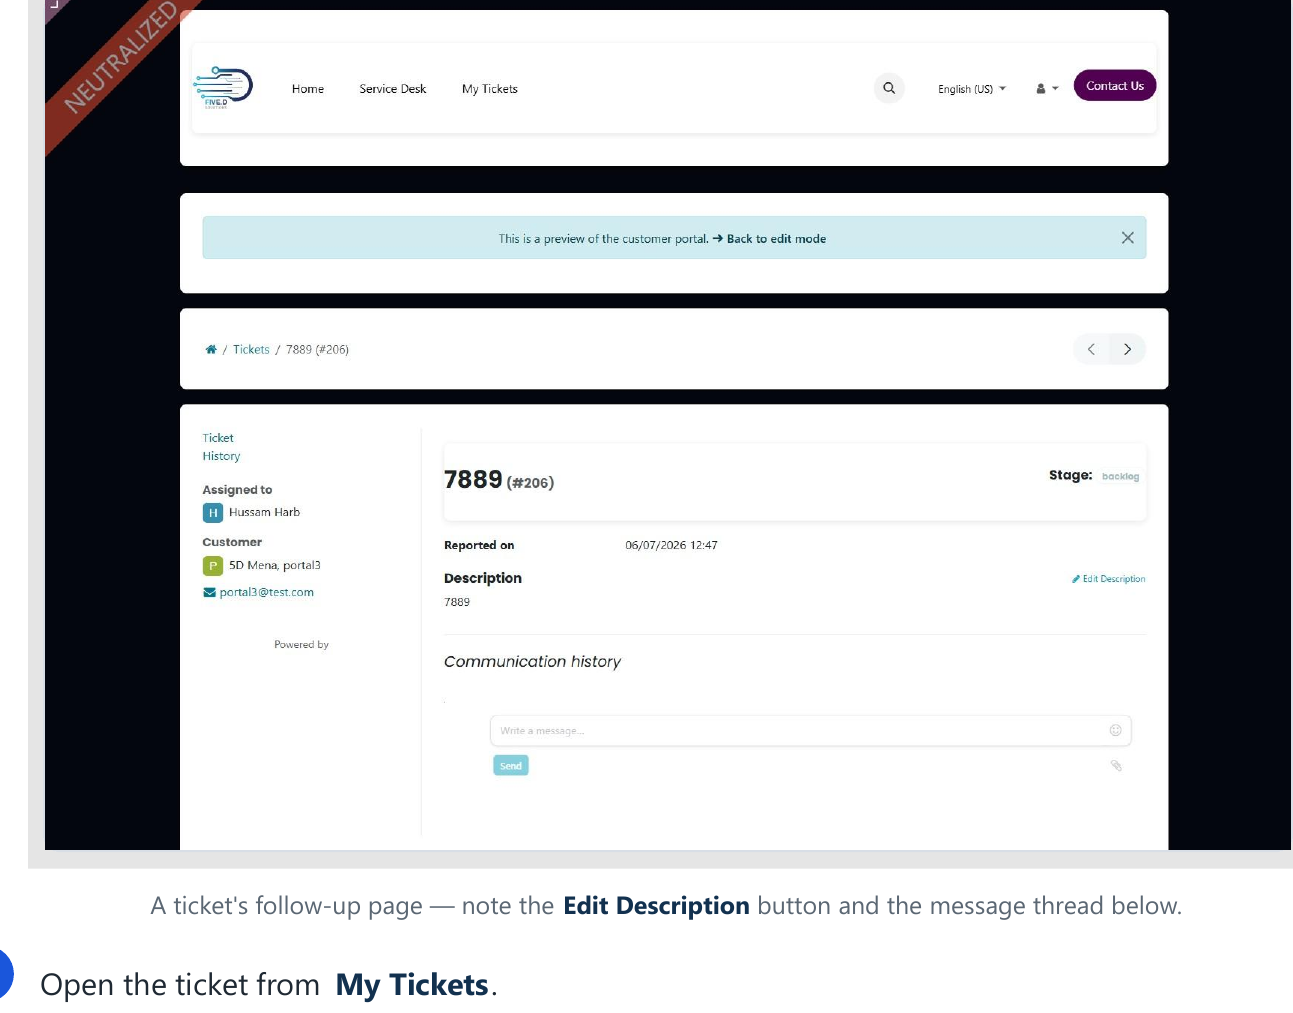
Your edits are recorded
When you save, the description updates immediately and a note is added to the ticket history showing that the description was changed. This keeps a clear, transparent record for both you and the support team.
9. Messages & notifications you'll receive
Because you follow your own tickets, key events are posted to the ticket's message thread. Here are the updates to expect.
| Event | What the message tells you |
|---|---|
| Ticket assigned | A support agent has been assigned to your ticket and will begin working on it. |
| Ticket reassigned | Your ticket has been moved to a different agent. |
| Stage changed | Your ticket moved to a new stage, shown as "[old stage] → [new stage]". |
| Priority approved | Your requested (higher) priority was accepted and applied. |
| Priority rejected | Your requested priority was declined, with the agent's reason included. |
| Description updated | The ticket description was changed (by you or the support team), with a record of the update. |
Where to find these
All of these appear in the message thread on your ticket's follow-up page, and you'll be notified as a follower of the ticket.
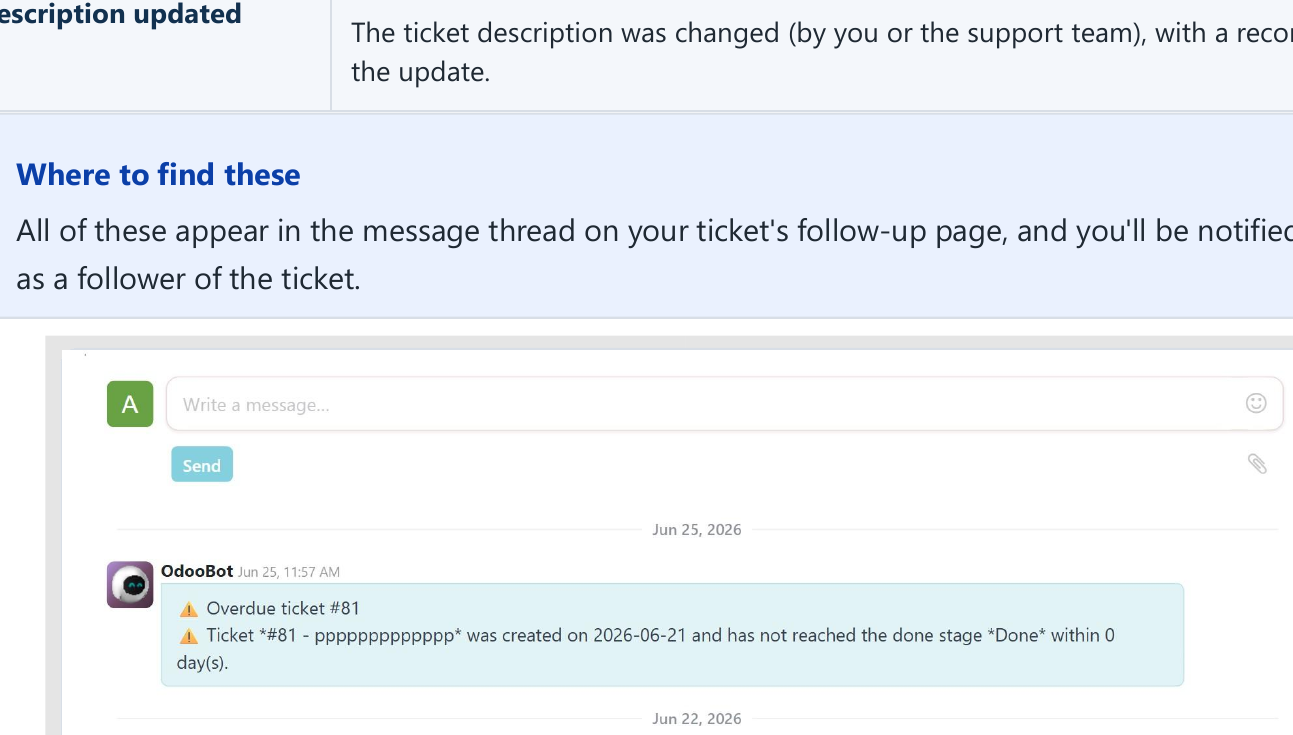
Escalation to the manager
If a ticket is at risk, the Service Desk escalates it automatically to the assigned agent's direct manager (from the HR org chart):
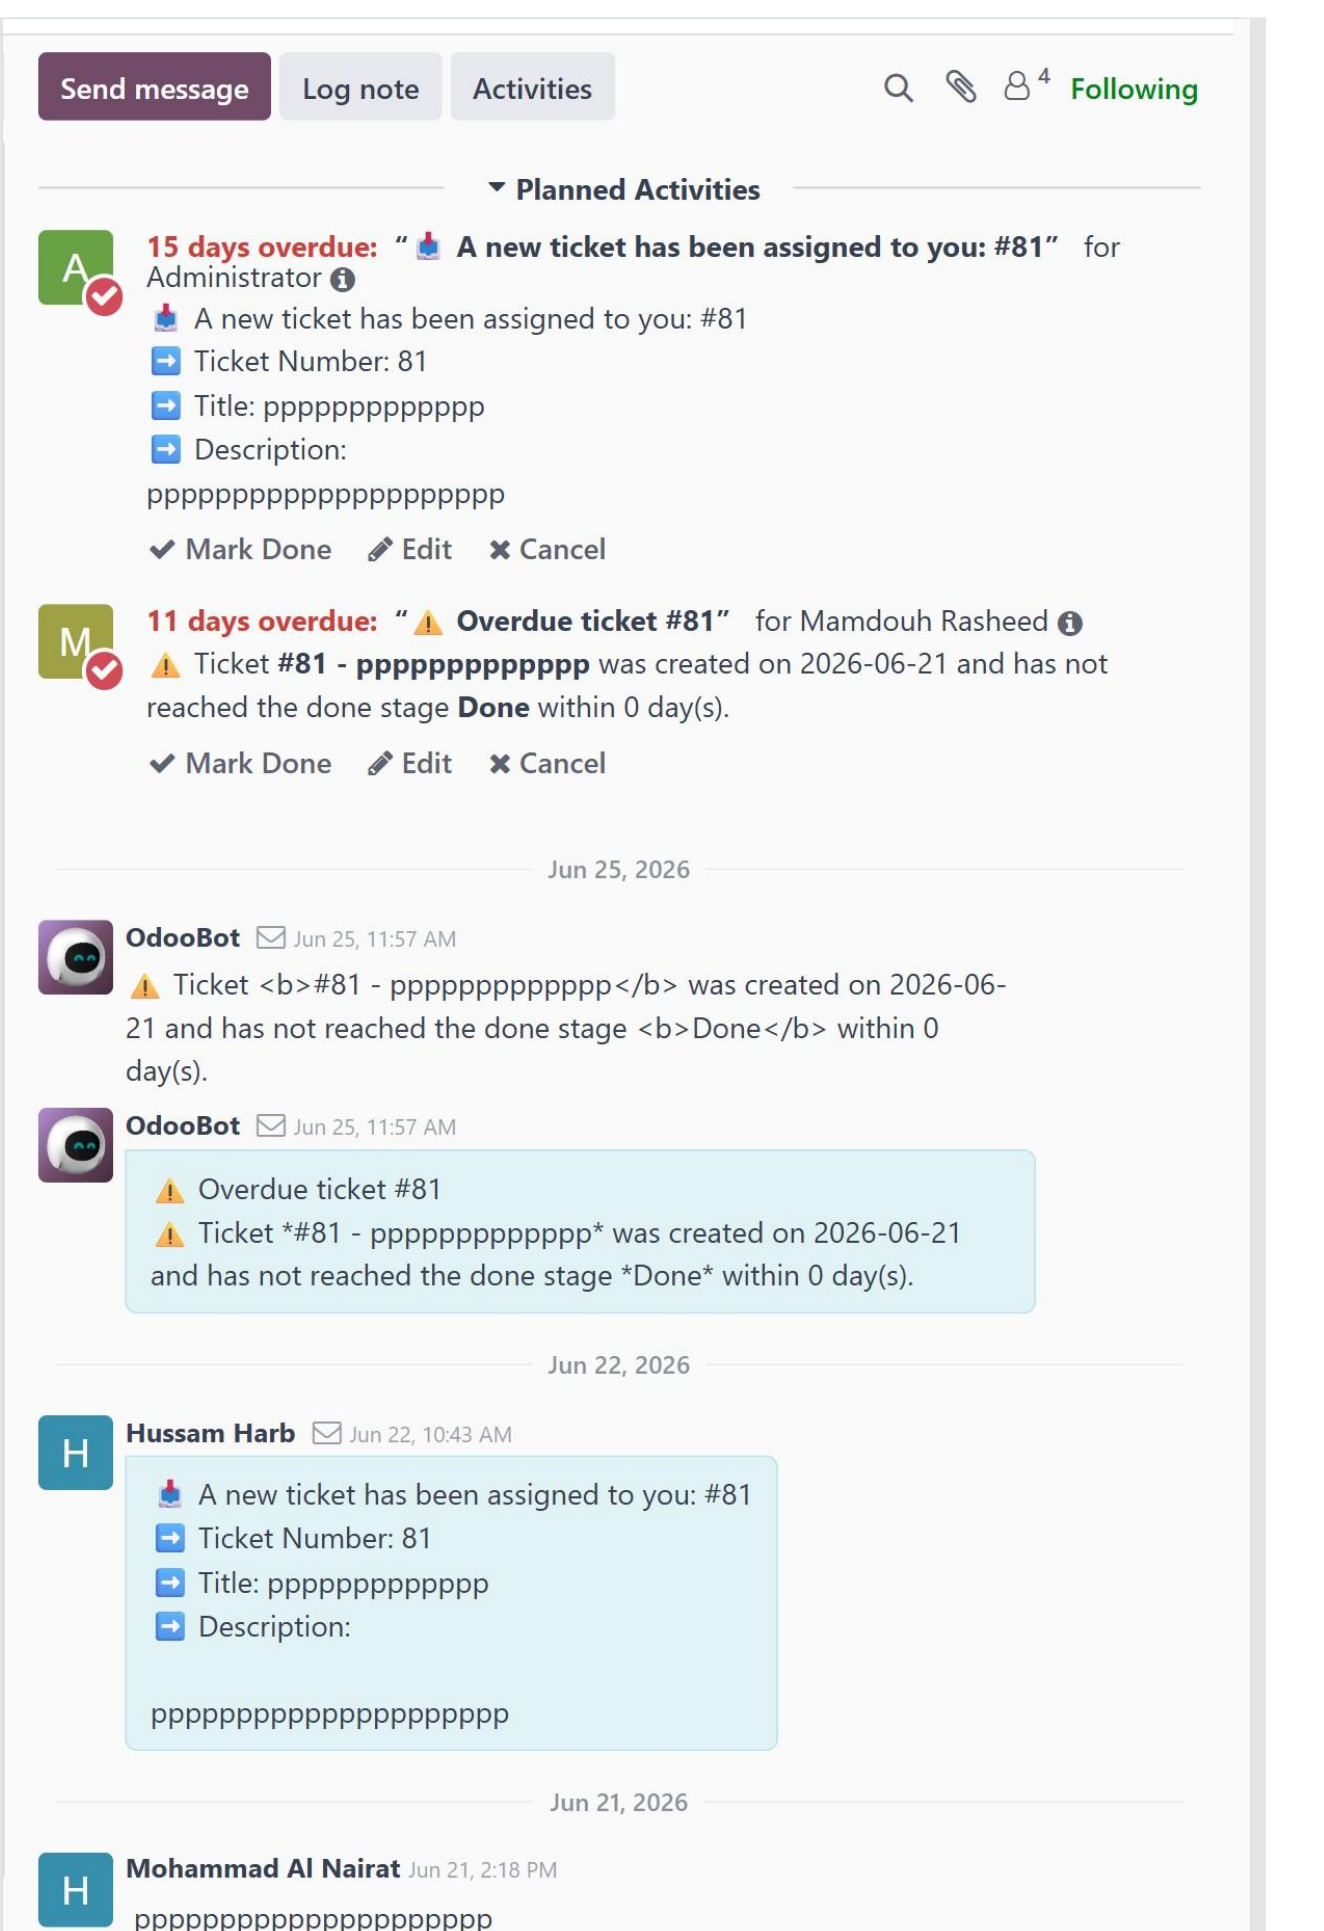
- SLA breach — when a ticket passes its SLA deadline, an "SLA Policy Failed" message is posted in the chatter and both the assignee and their manager are notified, with a to-do activity created for the manager (or the assignee if no manager is set).
- Overdue (not done in time) — if a ticket has not reached the Done stage within the configured number of days after it was created, the manager is alerted with an "Overdue ticket" message and a to-do activity.
These run automatically — in real time when the SLA deadline passes, and via a scheduled daily check for overdue tickets.
10. Using the "Contact Us" form
The website also has a general Contact Us form. It isn't a support ticket, but it uses the same quality checks so your message reaches us cleanly.
- Email must be a valid address (for example
user@example.com). - Phone follows the same rule as the ticket form: 10 digits, or "+" and 9–15 digits.
- Company is pre-filled from your profile when you're signed in.
If any field is invalid, the form highlights it and shows "Please correct the highlighted fields." before sending.
11. Troubleshooting & FAQ
Choose a Tag first. The Subtag list only activates after a Tag is selected, and it shows just the subtags linked to that Tag.
The phone number isn't in a valid format. Use exactly 10 digits (e.g. 0791234567) or a "+" followed by 9–15 digits (e.g. +962791234567). Remove any letters.
That's expected — both are pre-filled from your account and are read-only on the submission form to keep your records consistent.
Your request is recorded and reviewed by an agent. Until it's approved, the ticket keeps the standard priority for its category. You'll get a message when it's approved, or a message with a reason if it's declined (Section 6).
That button only appears on tickets you own. If you're viewing someone else's ticket, editing isn't available to you.
Support pages always run on the 5D website, so you may be switched there automatically. After signing in, your portal home also takes you straight to My Tickets.
Open the ticket and either edit the description (Section 8) or reply in the ticket's message thread.
12. Quick reference card
Where to go
| To do this… | Go here |
|---|---|
| See all my tickets | /my/tickets (or the ticket icon) |
| Create a new ticket | + Create Ticket button, the pencil icon, or /Service Desk |
| Open a ticket's details | Click the ticket in My Tickets |
| Update my ticket text | ✎ Edit Description on the ticket page |
Submission checklist
- Subject and description written clearly
- Tag selected
- Subtag selected (after choosing the Tag)
- Priority chosen
- Phone in a valid format (10 digits, or + and 9–15 digits)
Priority levels
| Level | Meaning |
|---|---|
| Low | Minor issue, no rush. |
| Medium | Normal request. |
| High | Important — needs attention soon. |
| Urgent | Critical — needs immediate attention (higher requests may be reviewed). |
13. Internal users (task requesters)
Internal staff (employees logged into Odoo, from any company) can raise and track tickets too. The flow matches the portal steps above — same form, same Tag/Subtag/Priority, same tracking — with a couple of differences noted here.
Top-bar shortcuts
Inside Odoo, two shortcuts sit in the top-right system tray:

Details come from your employee profile
On the submission form, your Name, Email, Company and Phone are pre-filled from your Odoo employee record (Email and Company are read-only).
What you can and can't change
You can submit tickets to the 5D team from any company, view your own tickets, add messages/attachments/followers, and edit your ticket's description. Changing core fields (stage, assignee, team, priority, tags/subtags, subject, or other details) on a 5D-team ticket is limited to users of the 5dmena company and administrators / managers.
Full internal walkthrough
See the companion 5D Service Desk — Internal User Guide for a step-by-step version of this section with screenshots.